Table of Contents
MicroUSB Power
ODROID-C1+
ODROID-C1+ can be supplied its power through USB OTG port, which is a H/W hack for ODROID-C1. Since ODROID-C1+ can consume current more than 500mA by itself while playing a video file or with some peripherals - keyboard/mouse/WiFi dongle - are attached to USB port, we strongly recommend to use 5V USB charger with minimal 700mA+ can be supplied.
Please note that still DC jack works with the same specification of ODROID-C1 apart from USB OTG for power supplying.
ODROID-C1
ODROID-C1 can be provided a power through Micro USB instead of DC jack.
You could select one of the two methods as follows:
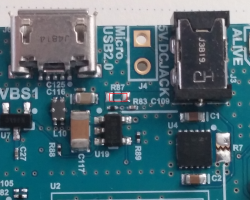
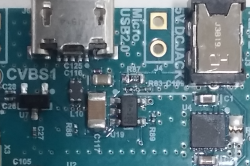
- Bridge two pads of R87 with soldering.
- Or Mount 0 ohm resister on R87 land(type 1608).
- Before mount R87 with 0 ohm resister (type 1608).
- After mount R87 with 0 ohm resister (type 1608).
Since MicroUSB connector have high contact resistance relatively than DC jack, there would be much more power loss.
If there is a USB device attached on USB host connector and consumes power a lot, the board might not be booted because the CPU can not be provided enough current. In order to prevent boot failure in such case, especially a USB device consumes a current more than 1A, we strongly recommend to keep providing power through DC jack.
How to enable for USB Device Mode on ODROID-C0
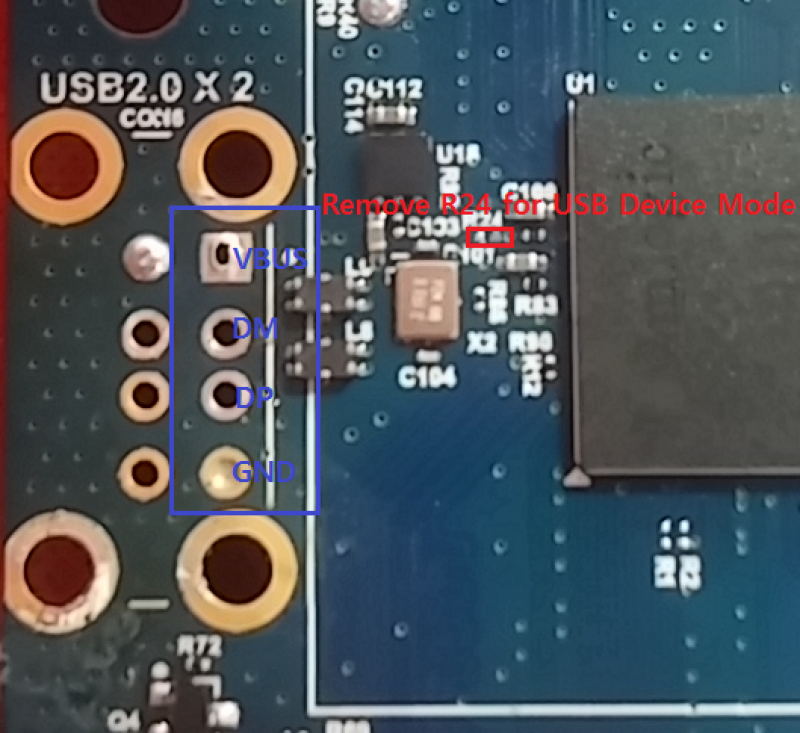
You need to unmount R24 as the red square in the following picture for USB device mode.
The inner USB port (in the blue square) works in device(client) mode. You may need a type-A to type-A USB cable.
Power On/Off switch
You can control power supplying to ODROID-C1+ and ODROID-C1 while DC adaptor is connected with external switch, Sliding or Toggle Switch for example, if you connect such switch to J4 on the board. J4 is connected to NCP372 (Protection IC). There is an ENABLE pin on the NCP372 and it is a low-active and have an internal pull-down resistor for default on.
| Switch status | Output of NCP372 | |
| ON(short) | OFF | |
| OFF(open) | ON (+5V) | |
With this hacking, we strongly recommend to shutdown the O/S completely before turn-off. Otherwise the file system could be damaged very easily. In Linux, for example, please make sure to execute shutdown -r now or poweroff.
IR Remote Controller (Android)
| Button | IR code | Scancode | Android |
|---|---|---|---|
| Power | 0xDC | 116 | KEYCODE_POWER |
| Mute | 0x88 | 113 | KEYCODE_VOLUME_MUTE |
| Home | 0x82 | 102 | KEYCODE_HOME |
| OK | 0xCE | 97 | KEYCODE_DPAD_CENTER |
| Up | 0xCA | 103 | KEYCODE_DPAD_UP |
| Left | 0x99 | 105 | KEYCODE_DPAD_LEFT |
| Right | 0xC1 | 106 | KEYCODE_DPAD_RIGHT |
| Down | 0xD2 | 108 | KEYCODE_DPAD_DOWN |
| Menu | 0xC5 | 139 | KEYCODE_MENU |
| Back | 0x9A | 158 | KEYCODE_BACK |
| Volume Down | 0x81 | 109 | KEYCODE_VOLUME_DOWN |
| Volume Up | 0x80 | 104 | KEYCODE_VOLUME_UP |
IR Remote Controller (Linux)
| Button | IR code | Scancode | XF86Map/Linux |
|---|---|---|---|
| Power | 0xDC | 124 | XF86PowerOff |
| Mute | 0x88 | 121 | XF86AudioMute |
| Home | 0x82 | 180 | XF86HomePage |
| OK | 0xCE | 36 | Return/Enter |
| Up | 0xCA | 111 | Up Arrow |
| Left | 0x99 | 113 | Left Arrow |
| Right | 0xC1 | 114 | Right Arrow |
| Down | 0xD2 | 116 | Down Arrow |
| Menu | 0xC5 | 135 | Menu |
| Back | 0x9A | 166 | XF86Back |
| Volume Down | 0x81 | 122 | XF86AudioLowerVolume |
| Volume Up | 0x80 | 123 | XF86AudioRaiseVolume |
Our default image didn't shipped with Remote installed. To install the remote support run the following commands on a terminal:
wget http://builder.mdrjr.net/tools/c1/odroid-remote_20141223-3_armhf.deb
sudo dpkg -i odroid-remote_20141223-3_armhf.deb
This is enough to enable the remote controller to run fine on Kodi (XBMC)
If you want to use the remote control Volume control keys on Lubuntu Desktop you need the follow extra steps
When you enable the control bellow, the remote events won't be passed to Kodi/XBMC. All keys will work just fine on Kodi/XBMC except that when you use volume up/down or mute it won't show on Kodi/XBMC screen but just execute it.
sudo apt-get install gnome-settings-daemon gnome-settings-daemon-schemas
echo /usr/bin/gnome-settings-daemon >> /home/odroid/.config/lxsession/Lubuntu/autostart
Alternative heartbeat LED
If you want to remap the blue heartbeat LED to other GPIO, need to edit the device-tree-file for C1 and change the GPIO used.
How-to-guide
device-tree-file for C1
USB Hub IC reset script
If you need to do power-cycle to the USB devices on the USB host ports, run below commands.
It will reset all the USB devices connected to the USB host ports.
echo 4 > /sys/class/gpio/export
echo out > /sys/class/gpio/gpio4/direction
sleep 1
echo 0 > /sys/class/gpio/gpio4/value
sleep 1
echo 1 > /sys/class/gpio/gpio4/value
echo 4 > /sys/class/gpio/unexport
sleep 1


