Table of Contents
ODROID-VU8C
8inch multi-touch screen for ODROID-C2 and C1+
It gives users the ability to create all-in-one, integrated projects such as tablets, game consoles, infotainment systems and embedded systems.
Assembly guide by ETA PRIME !
Specifications
- 8-inch TFT-LCD
- Resolution: 1024×768 pixels (4:3 ratio)
- finger capacitive touch input (USB ID 18D1:4E12)
- light brightness control with ODROID GPIO PWM
- consumption : 700mA/5Volt (Only LCD and display controller)
- angle : Left 75, Right 75, Up 75, Down 75 degree
- Dimensions : 189 x 149 x 29 mm
- Viewable screen size : 162 x121.5 mm (active area)\
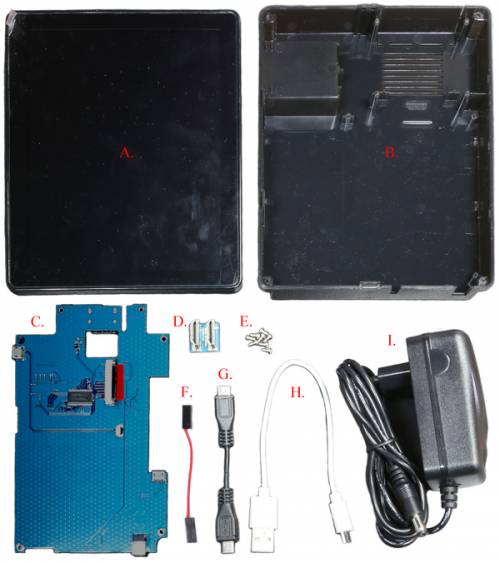
Package include
A. Assembled 8inch TFT LCD + 10 points multi touch screen
B. Plastic bottom case
C. Converter board
D. HDMI dual gender board
E. 8 x 3.5mm screws
F. 2port jumper cable
G. Micro-to-Micro USB Cable (approx. 8cm)
H. Micro-to-TypeA USB Cable (approx. 20cm)
I. 5V/4A Power supply
Usage
Software settings
Touchscreen drivers are available with support for 10 touch points, and proper drivers are integrated in the latest Ubuntu and Android OS images. Screen resolution must be configured to WVGA (1024×768) and the DVI option should be enabled on the “vout” parameter by editing the boot.ini file, as shown in the below.
To use the VU8 on C1/+ Linux system, the Kernel version must be 3.10.80-128 or higher (sudo apt-get update & sudo apt-get dist-upgrade).
1. Resolution configuration.
Edit boot.ini file.
Comment 1080p line out and uncomment the 1024×768 line enable “DVI” option.
.
.
# setenv m "1080p"  # 1080P@60Hz
.
.
setenv m "1024x768p60hz"
.
.
.
# HDMI DVI Mode Configuration

setenv vout "dvi" for C2
setenv vout_mode "dvi" for C1/C1+/C0
2. Backlight ON/OFF.
[ Ubuntu ]
Add the following lines into “/etc/rc.local”.
ODROID-C2
path="/sys/class/gpio"
echo 214 > $path/export
echo out > $path/gpio214/direction
echo 0 > $path/gpio214/value
ODROID-C1+/C1/C0
path="/sys/class/gpio"
echo 97 > $path/export
echo out > $path/gpio97/direction
echo 0 > $path/gpio97/value
[ Android ]
In case of Android, please add the followings in “init.odroid.board.rc”.
First, make the filesystem writable.
shell@odroidc2:/ $ su
root@odroidc2:/ # mount -o rw,remount /
Make or download the following shell script of the board model that you're using (C1 or C2)
and copy it in /system/bin/.
And make its permission executable.
# su
# chmod 755 /system/bin/vu8c_backlight_c2_android.sh
ODROID-C2
- vu8c_backlight_c2_android.sh
#!/bin/sh

path="/sys/class/gpio"

echo 214 > $path/export

echo out > $path/gpio214/direction
echo 0 > $path/gpio214/value

chown system system $path/gpio214/value
Now, you need to register the service to run this script automatically on boot time.
Add the following lines in the end of /init.odroid.board.rc.
Don't forget the root filesystem should be writable as aforementioned.
# su
# vi /init.odroid.board.rc
.....
.....
service vu8c_backlight /system/bin/vu8c_backlight_c2_android.sh
    class main
    user root
    group root
    oneshot
Then, reboot.
$ reboot
After reboot, you can confirm if the nodes are configured normally by checking “gpio214”.
$ ls /sys/class/gpio/
export
gpio214
gpiochip122
gpiochip136
unexport
ODROID-C1
- vu8c_backlight_c1_android.sh
#!/bin/sh

path="/sys/class/gpio"

echo 97 > $path/export

echo out > $path/gpio97/direction
echo 0 > $path/gpio97/value

chown system system $path/gpio97/value
Now, you need to register the service to run this script automatically on boot time.
Add the following lines in the end of /init.odroid.board.rc.
Don't forget the root filesystem should be writable as aforementioned.
# su
# vi /init.odroid.board.rc
.....
.....
service vu8c_backlight /system/bin/vu8c_backlight_c2_android.sh
    class main
    user root
    group root
    oneshot
Then, reboot.
$ reboot
After reboot, you can confirm if the nodes are configured normally by checking “gpio97”.
$ ls /sys/class/gpio/
export
gpio97
......
......
unexport
3. Backlight control with PWM.
GPIO configuration
ODROID-C2
cd /sys/class/gpio
echo 214 | sudo tee export
echo out | sudo tee gpio214/direction
echo 0 | sudo tee gpio214/value
echo 234 | sudo tee unexport
ODROID-C1+/C1/C0
cd /sys/class/gpio
echo 97 | sudo tee export
echo out | sudo tee gpio97/direction
echo 0 | sudo tee gpio97/value
echo 108 | sudo tee unexport
PWM configuration
[Ubuntu]
Load PWM driver modules.
sudo modprobe pwm-meson
sudo modprobe pwm-ctrl
Ignore warning message of “pwm-ctrl pwm-ctrl: cannot export to PWM-1 : modprobe pwm-meson npwm=2”
Enable PWM via sysfs.
echo 100000 | sudo tee /sys/devices/platform/pwm-ctrl/freq0
echo 1 | sudo tee /sys/devices/platform/pwm-ctrl/enable0
Set duty ratio (value can be 0 to 1023. Lower is brighter)
echo 1023 | sudo tee /sys/devices/platform/pwm-ctrl/duty0
[Android]
Load PWM driver modules.
root@odroidc2:/ # insmod /system/lib/modules/pwm-meson.ko npwm="1"
root@odroidc2:/ # insmod /system/lib/modules/pwm-ctrl.ko
Enable PWM via sysfs.
root@odroidc2:/ # cd /sys/devices/pwm-ctrl.43/
root@odroidc2:/sys/devices/pwm-ctrl.43 # ls
driver
duty0
enable0
freq0
modalias
power
subsystem
uevent
root@odroidc2:/sys/devices/pwm-ctrl.43 # cat enable0
PWM_0 : off
root@odroidc2:/sys/devices/pwm-ctrl.43 # echo 1 > enable0
root@odroidc2:/sys/devices/pwm-ctrl.43 # cat enable0
PWM_0 : on
Set default frequency.
root@odroidc2:/sys/devices/pwm-ctrl.43 # echo 100000 > freq0
Set duty ratio.
Value can be 0 to 1023 and lower value means brighter.
root@odroidc2:/sys/devices/pwm-ctrl.43 # cat duty0
0
root@odroidc2:/sys/devices/pwm-ctrl.43 #echo 160 > duty0
root@odroidc2:/sys/devices/pwm-ctrl.43 # cat duty0
160
4. How to Set Auto Backlight On/Off by Monitor Status
Please refer to the following wiki page if you want to run auto backlight on/off control that is triggered by monitor on/off status.
http://odroid.com/dokuwiki/doku.php?id=en:vu8c_backlightcontrol


