Table of Contents
Introduction C Tinkering Kit on Ubuntu
You're probably itching to make some fun embedded computer projects with ODROID-C. What you need is an add on prototyping T-breakout board, which can break out all those tasty power, GPIO, I2C, ADC pins from the 40 pin header onto a solderless breadboard. This set will make “cobbling together” prototypes with the ODROID-C super easy.
This kit comes with below many items.
- Assembled T-breakout PCB - 40Pin GPIO Breakout board
- Breadboard - 630 Tie-points with dual power lanes
- 40pin Ribbon cable - IDC Flat cable 100mm
- 40pin Male-to-Male Dupont jumper Wire 170mm
- 7 x Green LED 3mm
- 7 x Yellow LED 3mm
- 7 x Red LED 3mm
- 2 x Photo Cell (CdS Light sensor)
- 6 x Tact Switchs
- 50 x 330 Ohm 1/6W resister
- 50 x 10K Ohm 1/6W resister
DIY light level meter project
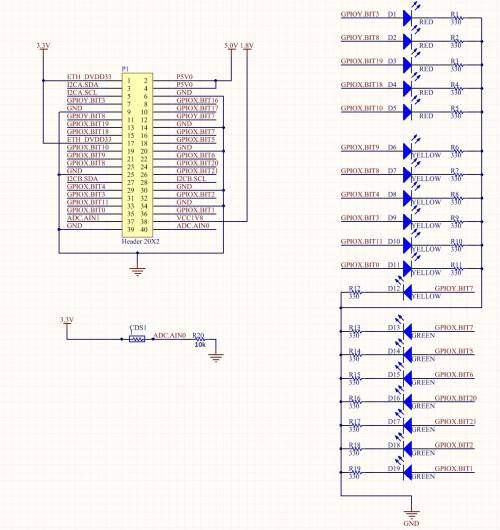
Configuration tinkering kit such as below schematic.
Please refer to below links for ODROID-C2 user or details related to gpio mapping.
Linux
C example (With WiringPi)
1. Get the wiringPi library compatible ODROID
sudo apt update && sudo apt install git
git clone https://github.com/hardkernel/wiringPi
2. Build the library
cd wiringPi
./build
3. Compile and run the example source code.
wget http://dn.odroid.com/source_peripherals/ctinkeringkit/example-led.c
gcc -o example-led example-led.c -lwiringPi -lwiringPiDev -lpthread
sudo ./example-led
Python example
Prerequisites: You must have python-dev and python-setuptools installed If you manually rebuild the bindings with swig-python wiringpi.i
sudo apt-get install python-dev python-setuptools swig3.0
1. Get/setup WiringPi 2 for Python repository
git clone https://github.com/hardkernel/WiringPi2-Python.git
cd WiringPi2-Python
git submodule init
git submodule update
2. Build & install
swig3.0 -python -threads wiringpi.i
sudo python setup.py install
Or
./build.sh
3. Get/Run the example source code
wget http://dn.odroid.com/source_peripherals/ctinkeringkit/example-led.py
sudo python example-led.py
Android
This process explains how to make an Android app which can access IO ports.
You need to install Google Android SDK/NDK on your host PC first to start below steps.
Insert this line into your ~/.bashrc file.
export NDK_PATH=/home/xxx/android-ndk-r10d
1. Download the wiringPi library and example App source code.
# git clone https://github.com/codewalkerster/example-led
2. Build a JNI library
$ cd example-led
$ cd jni
$ ndk-build
Android NDK: WARNING: APP_PLATFORM android-16 is larger than android:minSdkVersion 7 in /media/codewalker/92fc070a-3bc1-43e0-af27-03d08ba9dd3e/home/codewalker/workspace/xxxx/example-led/AndroidManifest.xml
[armeabi] Compile thumb  : wiringPi <= wiringPi.c
/media/codewalker/92fc070a-3bc1-43e0-af27-03d08ba9dd3e/home/codewalker/workspace/xxxx/example-led/jni/wiringPi/wiringPi.c:147:0: warning: "PAGE_SIZE" redefined [enabled by default]
 #define PAGE_SIZE   (4*1024)
 ^
In file included from /home/codewalker/projects/android-ndk-r10d/platforms/android-21/arch-arm/usr/include/signal.h:34:0,
                 from /home/codewalker/projects/android-ndk-r10d/platforms/android-21/arch-arm/usr/include/poll.h:34,
                 from /media/codewalker/92fc070a-3bc1-43e0-af27-03d08ba9dd3e/home/codewalker/workspace/xxxx/example-led/jni/wiringPi/wiringPi.c:59:
/home/codewalker/projects/android-ndk-r10d/platforms/android-21/arch-arm/usr/include/limits.h:119:0: note: this is the location of the previous definition
 #define PAGE_SIZE 4096
 ^
/media/codewalker/92fc070a-3bc1-43e0-af27-03d08ba9dd3e/home/codewalker/workspace/xxxx/example-led/jni/wiringPi/wiringPi.c: In function 'interruptHandler':
/media/codewalker/92fc070a-3bc1-43e0-af27-03d08ba9dd3e/home/codewalker/workspace/xxxx/example-led/jni/wiringPi/wiringPi.c:1865:7: warning: return makes pointer from integer without a cast [enabled by default]
       return wiringPiFailure (WPI_FATAL, "wiringPiISR: wiringPi has not been initialised. Unable to continue.\n") ;
       ^
[armeabi] Compile thumb  : wiringPi <= wiringShift.c
[armeabi] Compile thumb  : wiringPi <= piHiPri.c
[armeabi] Compile thumb  : wiringPi <= piThread.c
[armeabi] Compile thumb  : wiringPi <= wiringPiSPI.c
[armeabi] Compile thumb  : wiringPi <= wiringPiI2C.c
[armeabi] Compile thumb  : wiringPi <= softPwm.c
[armeabi] Compile thumb  : wiringPi <= softTone.c
[armeabi] Compile thumb  : wiringPi <= mcp23008.c
[armeabi] Compile thumb  : wiringPi <= mcp23016.c
[armeabi] Compile thumb  : wiringPi <= mcp23017.c
[armeabi] Compile thumb  : wiringPi <= mcp23s08.c
[armeabi] Compile thumb  : wiringPi <= mcp23s17.c
[armeabi] Compile thumb  : wiringPi <= sr595.c
[armeabi] Compile thumb  : wiringPi <= pcf8574.c
[armeabi] Compile thumb  : wiringPi <= pcf8591.c
[armeabi] Compile thumb  : wiringPi <= mcp3002.c
[armeabi] Compile thumb  : wiringPi <= mcp3004.c
[armeabi] Compile thumb  : wiringPi <= mcp4802.c
[armeabi] Compile thumb  : wiringPi <= mcp3422.c
[armeabi] Compile thumb  : wiringPi <= max31855.c
[armeabi] Compile thumb  : wiringPi <= max5322.c
[armeabi] Compile thumb  : wiringPi <= sn3218.c
[armeabi] SharedLibrary  : libwiringPi.so
[armeabi] Install        : libwiringPi.so => libs/armeabi/libwiringPi.so
[armeabi] Compile thumb  : wiringPiDev <= ds1302.c
[armeabi] Compile thumb  : wiringPiDev <= maxdetect.c
[armeabi] Compile thumb  : wiringPiDev <= piNes.c
[armeabi] Compile thumb  : wiringPiDev <= gertboard.c
[armeabi] Compile thumb  : wiringPiDev <= piFace.c
[armeabi] Compile thumb  : wiringPiDev <= lcd128x64.c
[armeabi] Compile thumb  : wiringPiDev <= lcd.c
[armeabi] Compile thumb  : wiringPiDev <= piGlow.c
[armeabi] SharedLibrary  : libwiringPiDev.so
[armeabi] Install        : libwiringPiDev.so => libs/armeabi/libwiringPiDev.so
[armeabi] Compile thumb  : wpi_android <= wpi_android.c
[armeabi] SharedLibrary  : libwpi_android.so
[armeabi] Install        : libwpi_android.so => libs/armeabi/libwpi_android.so
3. Import existing project to the eclipse IDE.
4. Run example-led
https://www.youtube.com/watch?v=zyfULOkj0Vw
5. Source code browsing!
Add below items in jni/Android.mk to build libwingPi.so and libwingPiDev.so
include $(CLEAR_VARS)
LOCAL_C_INCLUDES += \
    $(NDK_PATH)/platforms/android-21/arch-arm/usr/include \
    $(LOCAL_PATH)/wiringPi

LOCAL_MODULE    := wiringPi
LOCAL_SRC_FILES := \
    wiringPi/wiringPi.c \
    wiringPi/wiringShift.c \
    wiringPi/piHiPri.c \
    wiringPi/piThread.c \
    wiringPi/wiringPiSPI.c \
    wiringPi/wiringPiI2C.c \
    wiringPi/softPwm.c \
    wiringPi/softTone.c \
    wiringPi/mcp23008.c \
    wiringPi/mcp23016.c \
    wiringPi/mcp23017.c \
    wiringPi/mcp23s08.c \
    wiringPi/mcp23s17.c \
    wiringPi/sr595.c \
    wiringPi/pcf8574.c \
    wiringPi/pcf8591.c \
    wiringPi/mcp3002.c \
    wiringPi/mcp3004.c \
    wiringPi/mcp4802.c \
    wiringPi/mcp3422.c \
    wiringPi/max31855.c \
    wiringPi/max5322.c \
    wiringPi/sn3218.c

LOCAL_CFLAGS    += -UNDEBUG -DANDROID

LOCAL_LDLIBS    := -ldl -llog
include $(BUILD_SHARED_LIBRARY)


include $(CLEAR_VARS)
LOCAL_C_INCLUDES += \
    $(NDK_PATH)/platforms/android-21/arch-arm/usr/include \
    $(LOCAL_PATH)/wiringPi

LOCAL_MODULE    := wiringPiDev
LOCAL_SRC_FILES := \
    devLib/ds1302.c \
    devLib/maxdetect.c \
    devLib/piNes.c \
    devLib/gertboard.c \
    devLib/piFace.c \
    devLib/lcd128x64.c \
    devLib/lcd.c \
    devLib/piGlow.c

LOCAL_SHARED_LIBRARIES := libwiringPi

LOCAL_CFLAGS    += -UNDEBUG
include $(BUILD_SHARED_LIBRARY)
Make some JNI API functions to access the wirinPi library.
jint Java_com_hardkernel_wiringpi_MainActivity_analogRead(JNIEnv* env, jobject obj, jint port) {
    return analogRead(port);
}

void Java_com_hardkernel_wiringpi_MainActivity_digitalWrite(JNIEnv* env, jobject obj, jint port, jint onoff) {
    digitalWrite(port, onoff);
}

int Java_com_hardkernel_wiringpi_MainActivity_wiringPiSetupSys(JNIEnv* env, jobject obj) {
    wiringPiSetupSys();
    return 0;
}
Declare GPIO ports.
    private final int ledPorts[] = {
        97, // GPIOX.BIT0(#97)
        108, // GPIOX.BIT11(#108)
        100, // GPIOX.BIT3(#100)
        101, // GPIOX.BIT4(#101)
        105, // GPIOX.BIT8(#105)
        106, // GPIOX.BIT9(#106)
        107, // GPIOX.BIT10(#107)
        115,  // GPIOX.BIT18(#115)
        116,  // GPIOX.BIT19(#116)
        88,  // GPIOY.BIT8(#88)
        83,  // GPIOY.BIT3(#83)
        87,  // GPIOY.BIT7(#87)
        104,  // GPIOX.BIT7(#104)
        102,  // GPIOX.BIT5(#102)
        103,  // GPIOX.BIT6(#103)
        117, // GPIOX.BIT20(#117)
        99, // GPIOX.BIT2(#99)
        118, // GPIOX.BIT21(#118)
        98, // GPIOX.BIT1(#98)
    };
Define JNI functions
    public native int wiringPiSetupSys();
    public native int analogRead(int port);
    public native void digitalWrite(int port, int onoff);

    static {
        System.loadLibrary("wpi_android");
    }
Generate GPIO access nodes
Make SYSFS GPIO access nodes with the /sys/class/gpio/export
Change the GPIO pins to output mode via direction node.
Don't forget to change the permissions for those nodes.
    boolean exportGPIO() {
        try {
            DataOutputStream os = new DataOutputStream(mProcess.getOutputStream());
            for (int port: ledPorts) {
                os.writeBytes("echo " +  port + " > /sys/class/gpio/export\n");
                os.writeBytes("chmod 666 /sys/class/gpio/gpio" + port + "/direction\n");
                os.writeBytes("echo out > /sys/class/gpio/gpio" + port + "/direction\n");
                os.writeBytes("chmod 666 /sys/class/gpio/gpio" + port + "/value\n");
            }
            os.flush();
        } catch (IOException e1) {
            // TODO Auto-generated catch block
            e1.printStackTrace();
            return false;
        }

        return true;
    }
Korean: wiringPi의 “/dev/mem”을 open 하여 mmap을 사용하는 방식으로 만들려고 하였으니 “/dev/mem”은 root가 아니면 접근을 제한하도록 되어 있어서 불가능합니다. jni의 library에는 root 권한을 줄 방법이 없습니다.
English: It was impossible to access the /dev/mem in the Android platform because only root can access it. There is no way to add a root permission to the JNI library.
Let's display and access the GPIO
This function runs every 100msec.
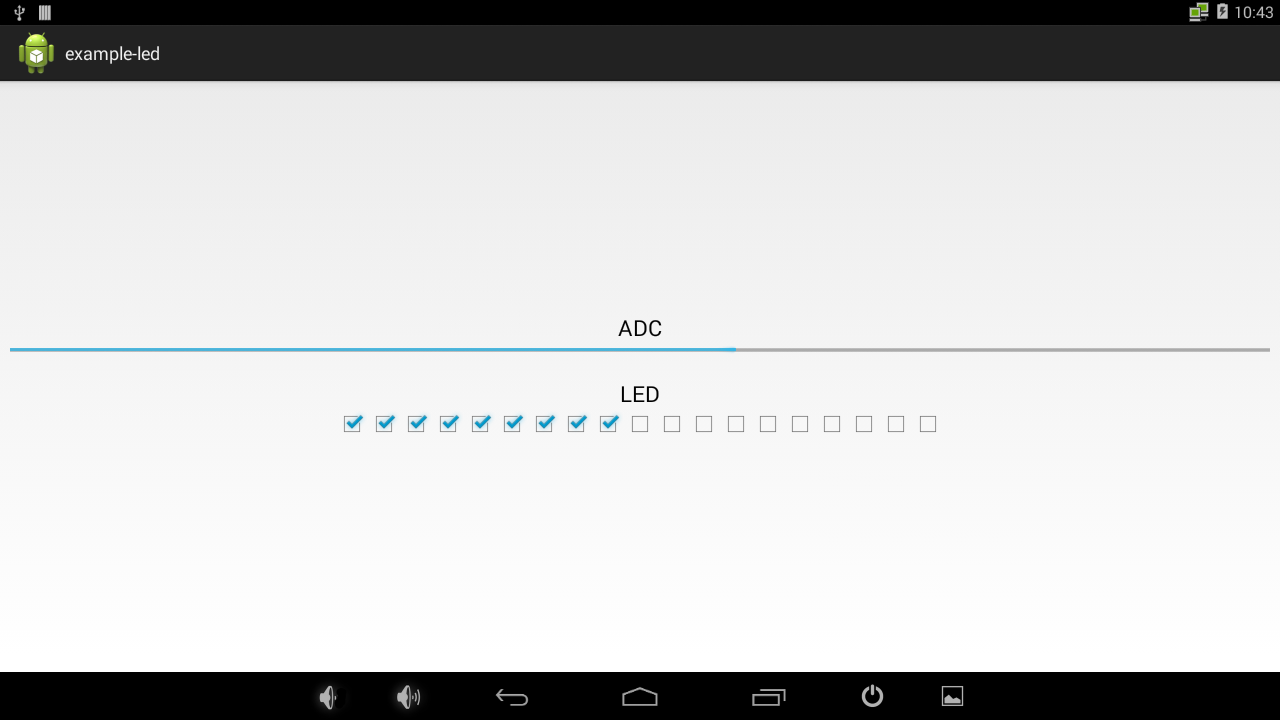
It reads the ADC value and update the GUI as well as LED level meter.
The CdS optical sensor is connected to the ADC.
    public void update() {
        int i = 0;
        int adcValue = 0;
        int ledPos = 0;
        if ((adcValue = analogRead (PORT_ADC1)) > 0) {
            ledPos = (adcValue * ledPorts.length * 1000) / 1024;
            ledPos = (ledPorts.length - (ledPos / 1000));
            mADC.setProgress(adcValue);
        } else
            ledPos = 0;

        for (i = 0; i < ledPorts.length; i++) {
            digitalWrite (ledPorts[i], 0);
            mLeds.get(i).setChecked(false);
        }

        for (i = 0; i < ledPos; i++) {
            digitalWrite (ledPorts[i], 1);
            mLeds.get(i).setChecked(true);
        }

        if (!mStop)
            handler.postDelayed(runnable, 100);
    }
Note that wiringPiSetupSys() should be called once to initialize the wiringPi library.


