Table of Contents
Introduction
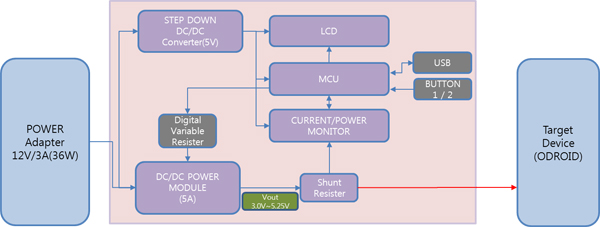
The easy way to make a Green platform. The ODROID Smart Power is an easily deployable power supply that collects voltage, current and power of the system load to enable developers to optimize energy consumption. LCD shows voltage, current, watt and watt-hour(Wh) simultaneously. You can also see the graphical energy transient on your PC via USB interface.
Specifications
| MCU | PCI18F45K50 |
| Output Voltage | DC 3.00 ~ 5.25Volt |
| Output Current | DC 5A (Max) |
| Input Power | DC 12Volt/3A (36Watt) |
| Measurement | Voltage, Current, Watt, Watt-Hour |
| Tolerant | 2%(Typ.) |
| LCD | 16×2 Character type with LED backlight |
| USB device port | Data communication with PC (10Hz sampling rate) |
| Button | Output On/Off, Start/stop measurement of Watt-Hour |
| Volume | Voltage Adjust |
| Output | 4mm diameter banana jack, USB Host port, Wire connector |
| ETC | Firmware update via USB |
Components
PACKAGE INCLUDES :
- ODROID Smart Power
- Power supply unit (AC-DC Adapter)
- USB cable
- Hook clip cable
- DC plug cable (5.5mm/2.1mm)for ODROID-XU/XU+E
- DC plug cable (2.5mm/0.8mm) for ODROID-X/X2/U2/X2
How to control Smart Power
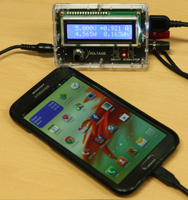
Measure the system load of smartphones. The ODROID Smart Power is an easily deployable power supply that collects voltage, current and power of the system load to enable developers to optimize energy consumption.
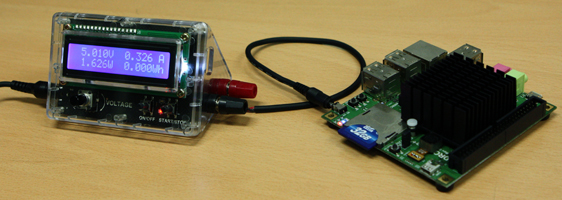
Measure the system load of ODROIDs, X / X2 / U2 / XU
LCD shows voltage, current, watt and watt-hour(Wh) simultaneously.
PC Application
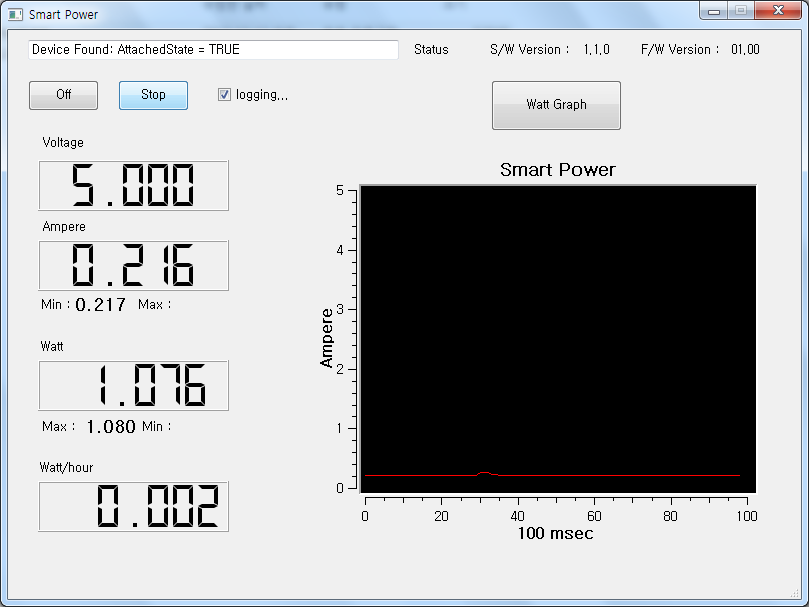
You can see the graphical energy transient on your PC via USB interface.
The binary executable files for PC Application (Windows & Linux).
http://dn.odroid.com/Smart_Power/Smart_Power-FW-V31.zip
You can find some useful information in our forum too http://forum.odroid.com/viewforum.php?f=86
How to compile PC Application for Windows
Download and install Qt 4.8.4(MinGW) version
[ http://download.qt-project.org/archive/qt/4.8/4.8.4/qt-win-opensource-4.8.4-mingw.exe ]
Add C:\Qt\4.8.4\bin to your systems path variable (qmake.exe is located here)
Add C:\MinGW\bin to your systems path variable (mingw32-make.exe. is located here)
Download and extract qwt-6.1.0
[ http://sourceforge.net/projects/qwt/files/qwt/6.1.0/qwt-6.1.0.zip ]
Copy the qwt-6.1.0 to C:\qwt-6.1.0
build the qwt-6.1.0
Open a command line (cmd) and navigate to “C:\qwt-6.1.0”
> cd C:\qwt-6.1.0
> qmake
> make
> make install
> qmake -set QMAKEFEATURES C:\qwt-6.1.0\features
Add C:\qwt-6.1.0\lib to your systems path variable (qwtd.dll is located here)
Download the PC Application source code
[ http://dn.odroid.com/Smart_Power/smartpower_source.zip ]
Extract the smartpower_source.zip
build the smart_power_app
> cd smartpower_source\HIDAPI
> qmake
> make -f MakeFile.Release
> cd ..\smartpower_source\smartpower
> qmake
> make -f MakeFile.Release
You can get the .exe file to smartpower/windows/SmartPower.exe
How to compile PC Application for Ubuntu
install packages
apt-get install qt4-default qt4-designer libqwt-dev libusb-1.0-0-dev
build the smart_power_app
cd HIDAPI
qmake
make
cd ../smartpower
uic smartpower.ui > ui_smartpower.h
qmake
make
create rules file
sudo vi /etc/udev/rules.d/99-hiid.rules
# This is a sample udev file for HIDAPI devices which changes the permissions
# to 0666 (world readable/writable) for a specified device on Linux systems.


# If you are using the libusb implementation of hidapi (hid-libusb.c), then
# use something like the following line, substituting the VID and PID with
# those of your device. Note that for kernels before 2.6.24, you will need
# to substitute "usb" with "usb_device". It shouldn't hurt to use two lines
# (one each way) for compatibility with older systems.

# HIDAPI/libusb
SUBSYSTEM=="usb", ATTRS{idVendor}=="04d8", ATTRS{idProduct}=="003f", MODE="0666"


# If you are using the hidraw implementation, then do something like the
# following, substituting the VID and PID with your device. Busnum 1 is USB.

# HIDAPI/hidraw
KERNEL=="hidraw*", ATTRS{busnum}=="1", ATTRS{idVendor}=="04d8", ATTRS{idProduct}=="003f", MODE="0666"

# Once done, optionally rename this file for your device, and drop it into
# /etc/udev/rules.d and unplug and re-plug your device. This is all that is
# necessary to see the new permissions. Udev does not have to be restarted.

# Note that the hexadecimal values for VID and PID are case sensitive and
# must be lower case.

# If you think permissions of 0666 are too loose, then see:
# http://reactivated.net/writing_udev_rules.html for more information on finer
# grained permission setting. For example, it might be sufficient to just
# set the group or user owner for specific devices (for example the plugdev
# group on some systems).
restart system.
./linux/SmartPower
Hardware
This file is the full schematics of ODROID Smart Power.
http://dn.odroid.com/Smart_Power/PowerMeter20130624.pdf
PCI18F45K50 MCU data sheet : http://www.microchip.com/wwwproducts/Devices.aspx?dDocName=en558861
Software
Cross Compiler
MPLAB C18 v3.43 or higher (From Microchip homepage) :
http://www.microchip.com/stellent/idcplg?IdcService=SS_GET_PAGE&nodeId=1406&dDocName=en010014&redirects=c18)
In my case, Standard-Eval Version (Free of Charge) was downloaded for my code optimization. It is the trial version and can only be used for 60 days.
IDE
X IDE v1.51 or higher (From Microchip homepage :
http://www.microchip.com/pagehandler/en-us/family/mplabx )
How to write firmware
The firmware source code of ODROID Smart Power.
http://dn.odroid.com/Smart_Power/Smart_Power_V31_src.zip
If you unzip the fw source code, there are two major directories.
Microchip : it contains the USB framework for firmware.
USB/Device - HID - Custom Demos/Firmware : it contains main firmware source code of Smart Power.
USB/Device - Bootloaders/HID/Firmware - PIC18 Non-J : it contains bootloader source code for Smart Power.
Prebuilt firmware & PC Util
http://dn.odroid.com/Smart_Power/Smart_Power-FW-V31.zip
Write firmware sequence
1. Power on(Insert AC Plug) with ON/OFF key pressed.
2. Run HIDBootloader (Windows).exe
3. Micro-USB port connect to Windows PC.
4. File → Import firmware image and select Smart_Power-V31.hex file.
5. Erase/progran/verify device and Reset device.
How to write the bootloader
More application
You can find a more comprehensive guide on Magazine 2014 October issue.
Magazine October 2014


