This is an old revision of the document!
Table of Contents
ODUINO ONE is a package of Arduino Uno R3 and LCD/Keypad/sensor. You can buy this item in this link. (Will be available soon)
Arduino Uno R3 schematics http://arduino.cc/en/uploads/Main/Arduino_Uno_Rev3-schematic.pdf
LCD+Keypad shield schematics http://dn.odroid.com/ODUINO/schematics-v1.0-dfr0009.pdf
DHT11 Sensor (Humidity / Temperature sensor) http://www.micro4you.com/files/sensor/DHT11.pdf
Connections are (V)oltage, (S)ignal, (G)round

DHT11 uses one-wire communication and I connected it to the digital Pin#3 of Arduino. Also note that we should add a 10Kohm pull-up resistor on that pin.

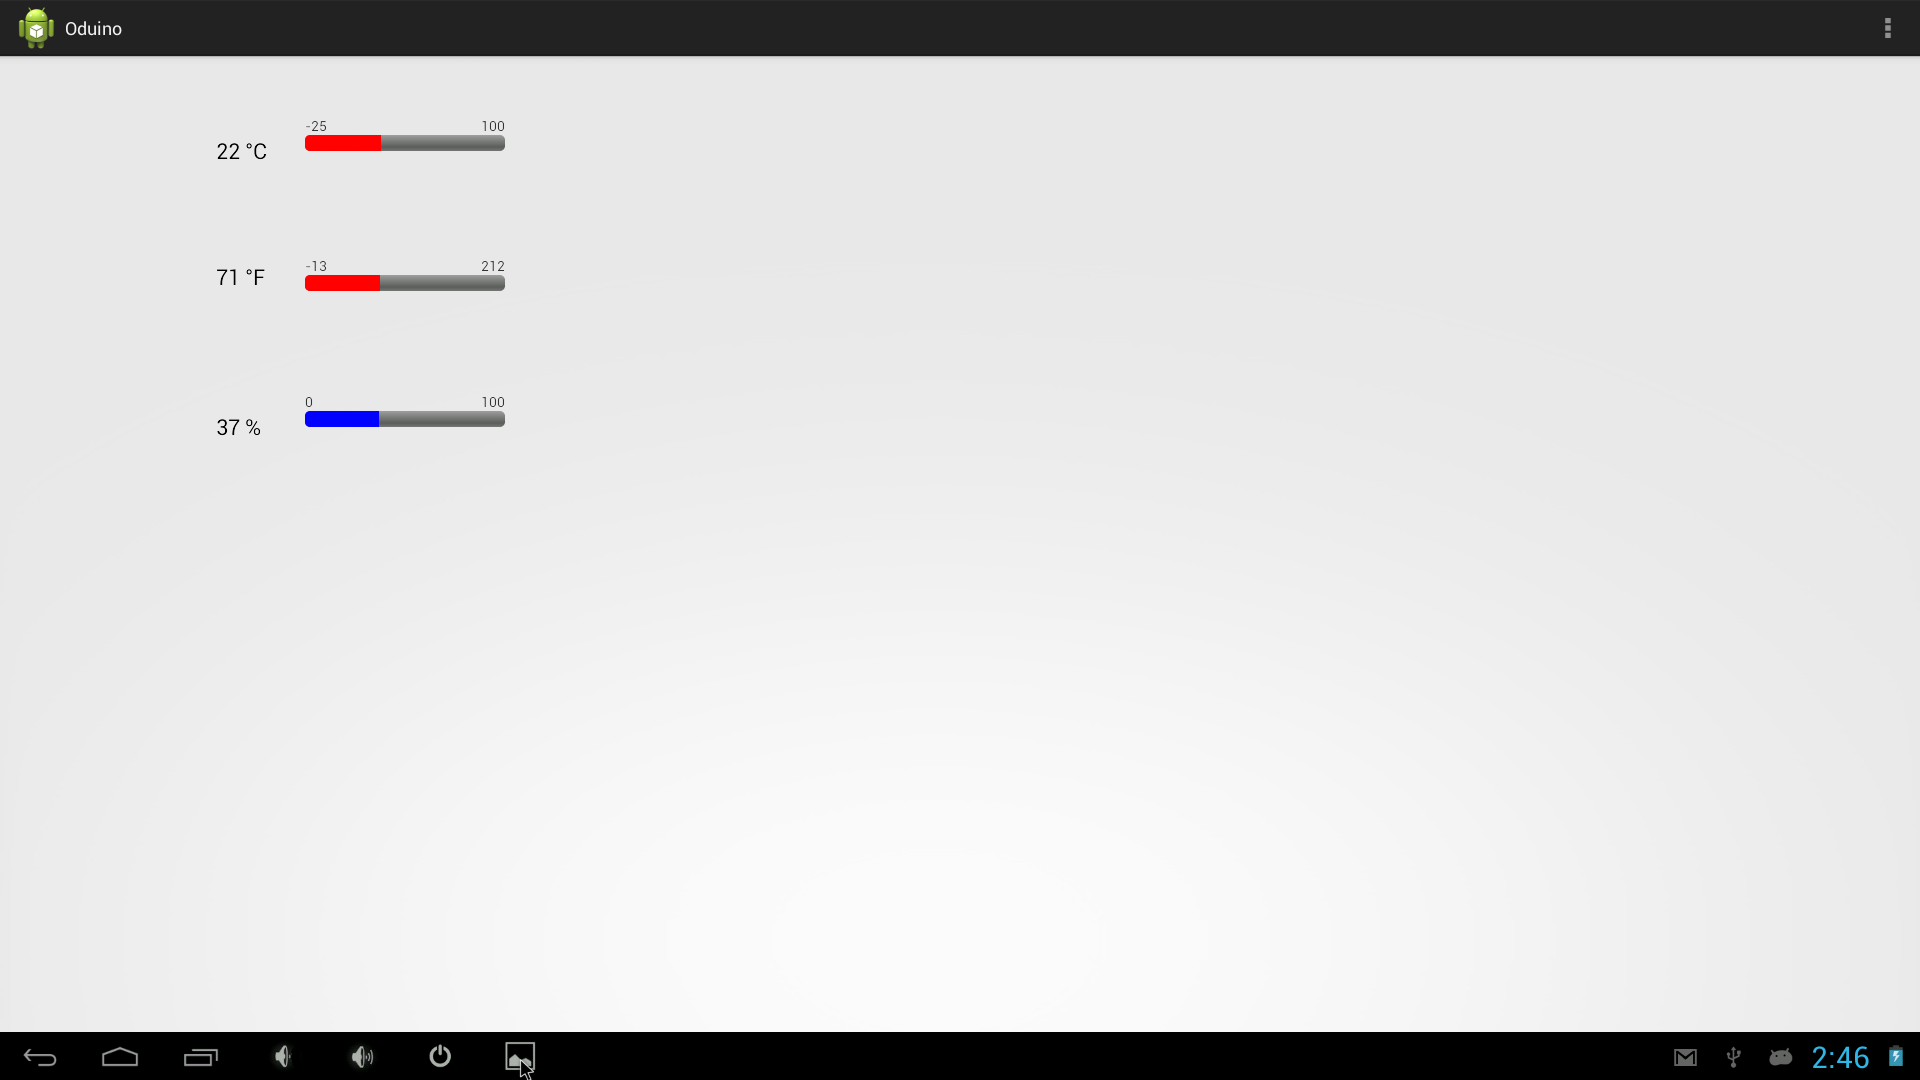
The example code shows the temperature, humidity and pressed keypad information on LCD. It also transmit that information to the host via USB.

To compile this source code, you need to install the Arduino IDE on your ODROID board or PC. [code] sudo apt-get install arduino [/code]
I could run the Arduino IDE on ODROID with Ubnutu image. The connection node of Arduino USB is “/dev/ttyACM0” or “/dev/ttyACM1”.
To complete to compile this test code, you must install the library of DHT sensor.
Download dht.cpp and dht.h from below link and copy them into “~/sketchbook/libraries/dht”.
http://playground.arduino.cc/Main/DHTLib
I should restart the Arduino IDE after copying to use the library.
[code]
  #include <LiquidCrystal.h>
  #include <dht.h>
  /*******************************************************
  This program will test the LCD panel, the buttons
  and the Humidity/Temperature sensor
  Version : 0.1
  Date : 20-Oct-2013
  By Hardkernel
  ********************************************************/
  // for Digital Humidity and Temperature sensor (DHT11)
  dht DHT;
  #define DHT11_PIN 3
  // Global variables
  unsigned long elapsed_time;
  // select the pins used on the LCD panel
  LiquidCrystal lcd(8, 9, 4, 5, 6, 7);

  // define some values used by the panel and buttons
  int lcd_key     = 0;
  int adc_key_in  = 0;
  #define btnRIGHT  0
  #define btnUP     1
  #define btnDOWN   2
  #define btnLEFT   3
  #define btnSELECT 4
  #define btnNONE   5

  // read the buttons
  int read_LCD_buttons()
  {
   adc_key_in = analogRead(0);      // read the value from the sensor
   // my buttons when read are centered at these valies: 0, 144, 329, 504, 741
   // we add approx 50 to those values and check to see if we are close
   if (adc_key_in > 1000) return btnNONE; // We make this the 1st option for speed reasons since it will be the most likely result
   if (adc_key_in < 50)   return btnRIGHT;
   if (adc_key_in < 195)  return btnUP;
   if (adc_key_in < 380)  return btnDOWN;
   if (adc_key_in < 555)  return btnLEFT;
   if (adc_key_in < 790)  return btnSELECT;
   return btnNONE;  // when all others fail, return this...
  }

  void setup()
  {
       // initialize serial communication at 115200 bits per second:
       Serial.begin(115200);
       lcd.begin(16, 2);              // start the LCD library
       lcd.setCursor(0,0);
       lcd.print(" Hello, ODUINO! "); // print a simple message
       //         1234567890123456
       delay(1500); // Splash for 1.5 second
       Serial.println("ODUINO TEST PROGRAM ");
       Serial.println();
       Serial.println("Type,\tstatus,\tHumidity (%),\tTemperature (C)");
       elapsed_time = millis()/1000; // Returns the number of milliseconds since the Arduino board began running the current program.
  }

  void loop()
  {
       lcd.setCursor(0,1);            // move to the begining of the second line
       lcd.print("KEY :");
       lcd.setCursor(6,1);            // move to the begining of the second line
       lcd_key = read_LCD_buttons();  // read the buttons
       switch (lcd_key)               // depending on which button was pushed, we perform an action
       {
         case btnRIGHT:
           {
           lcd.print("RIGHT ");
           Serial.println("RIGHT ");
           break;
           }
         case btnLEFT:
           {
           lcd.print("LEFT   ");
           Serial.println("LEFT ");
           break;
           }
         case btnUP:
           {
           lcd.print("UP    ");
           Serial.println("UP ");
           break;
           }
         case btnDOWN:
           {
           lcd.print("DOWN  ");
           Serial.println("DOWN ");
           break;
           }
         case btnSELECT:
           {
           lcd.print("SELECT");
           Serial.println("SELECT ");
           break;
           }
           case btnNONE:
           {
           lcd.print("NONE  ");
           break;
           }
       }
       // Read & Display the humidity / temperature data every 1 second (approx.)
       if(elapsed_time != millis()/1000)
       {
              elapsed_time = millis()/1000;
              Serial.print("DHT11, \t");
              int chk = DHT.read11(DHT11_PIN);
              switch (chk)
              {
                case DHTLIB_OK:
                            Serial.print("OK,\t");
                            break;
                case DHTLIB_ERROR_CHECKSUM:
                            Serial.print("Checksum error,\t");
                            break;
                case DHTLIB_ERROR_TIMEOUT:
                            Serial.print("Time out error,\t");
                            break;
                default:
                            Serial.print("Unknown error,\t");
                            break;
              }
              // DISPLAY DATA
              Serial.print(DHT.humidity,0);
              Serial.print(",\t");
              Serial.println(DHT.temperature,0);

              lcd.setCursor(0,0);            // move cursor to second line "1" and 9 spaces over
              lcd.print("HUMI:");
              lcd.print((int)(DHT.humidity));
              lcd.print("%");
              lcd.print(" TEM:");
              lcd.print((int)(DHT.temperature));
              lcd.print("C");
       }
       delay(50); // delay 50 msec.
  }
[/code]
Application
Qt(Ubuntu x86)
Qt(Ubuntu arm)
http://dn.odroid.com/ODUINO/binary/Ubuntu_Qt/arm/oduino

The binary source code of PC Application. http://dn.odroid.com/ODUINO/source/Ubuntu_Qt/oduino.zip
How to compile x86 and ARM Application for Ubuntu
install packages
apt-get install qt4-default qt4-designer libqwt-dev
build the oduino
$ cd oduino
$ uic oduin.ui > ui_oduino.h
$ qmake
$ make
Android
http://dn.odroid.com/ODUINO/binary/Android/Oduino.apk
The binary source code of Android Application. http://dn.odroid.com/ODUINO/source/Android/Oduino.zip
