Table of Contents
Use to 3.5inch LCD Shield
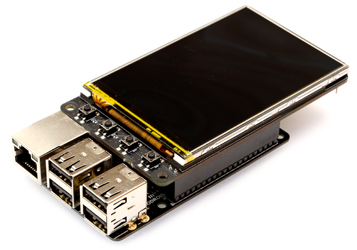
Fully assembled 3.5inch display with 480×320 pixels TFT LCD and a resistive touch overlay. Just plug it on top of ODROID-C2/C1+/C0. XU4 needs the Shifter-Shield board to use this display.
You will need an official Ubuntu image to configure it. You can simply download the Kernel updates (via dist-upgrade) and configure your ODROID for this display shield.
Specifications
| LCD Type | TFT |
| LCD Interface | Parallel 8-bit |
| LCD Controller | ILI9488 |
| LCD Active area | 48.96(H) x 73.44(V)mm |
| Touch Screen Type | Resistive |
| Touch Screen Controller | SX865X(I2C) |
| Backlight | LED |
| Resolution | 480*320(Pixel) |
| Board Size | 56(H) x 95(V) x 17(T)mm |
| ETC | 5pin RTC Shield connector |
Schematic : 3.5inch_lcd_rev0.1.pdf
Used pins
| Pin Num | Symbol | Description |
|---|---|---|
| 1, 17 | 3.3V | Power positive (3.3V power input) |
| 2, 4 | 5V | Power positive (5V power input) |
| 3 | RTC_SDA | I2C data bus for RTC |
| 5 | RTC_SCL | I2C clock for RTC |
| 6, 9, 14, 20, 25, 30, 34, 39 | GND | Ground |
| 7 | RTC_INT | Interrupt for RTC shield |
| 8, 10, 26, 31, 35, 37 | NC | No connection |
| 11 | /RSTB | Reset signal input terminal. Active at 'L'. |
| 12 | /CS | Chip select signal input pin |
| 13 | DB7 | Data bus |
| 15 | DB6 | Data bus |
| 16 | DB2 | Data bus |
| 18 | DB0 | Data bus |
| 19 | DB5 | Data bus |
| 21 | DB4 | Data bus |
| 22 | DB1 | Data bus |
| 23 | DB3 | Data bus |
| 24 | WRB | Write strobe signal |
| 27 | TP_SDA | I2C data bus for Touch controller |
| 28 | TP_SCL | I2C Clock for Touch controller |
| 29 | RS | Register select signal. |
| 32 | TP_NRST | Reset for Touch controller |
| 33 | LEDK | Backlight GPIO |
| 36 | TP_NIRQ | Interrupt for Touch controller |
| 38 | VDD1V8 | Power positive (1.8V power input) |
| 40 | SW ADC | ADC Input for Switches |
GPIO pin map
| Pin Num | Name | Export GPIO num | ||
|---|---|---|---|---|
| C2 | C1 | Shift shield on XU4 | ||
| 11 | reset | #247 | #88 | #174 |
| 29 | dc | #228 | #101 | #28 |
| 24 | wr | #229 | #117 | #190 |
| 12 | cs | #238 | #87 | #173 |
| 18 | db00 | #233 | #102 | #23 |
| 22 | db01 | #231 | #103 | #24 |
| 16 | db02 | #236 | #104 | #19 |
| 23 | db03 | #230 | #105 | #189 |
| 21 | db04 | #232 | #106 | #191 |
| 19 | db05 | #235 | #107 | #192 |
| 15 | db06 | #237 | #115 | #22 |
| 13 | db07 | #239 | #116 | #21 |
How to activate the 3.5inch LCD shield with your ODROID-C2/C1
You need a HDMI connection or a Serial/SSH console connection to follow below instruction.
Configuring framebuffer and Touch driver
0. Update your Kernel
sudo apt-get update
sudo apt-get upgrade
sudo apt-get dist-upgrade
1. Insert modules
ODROID-C1/C2
sudo modprobe aml_i2c
sudo modprobe pwm-meson
sudo modprobe pwm-ctrl
sudo modprobe fbtft_device name=flexpfb rotate=270
sudo modprobe flexfb chip=ili9488
sudo modprobe sx865x
ODROID-XU4
First, To enable sx865x touch driver on ODROID-XU4 you need to fix a dtb as following commands.
sudo apt-get install device-tree-compiler
sudo cp /media/boot/exynos5422-odroidxu3.dtb /media/boot/exynos5422-odroidxu3.dtb.old
sudo fdtput -t s /media/boot/exynos5422-odroidxu3.dtb /hsi2c@12CB0000/sx865x@49 status "okay"
sudo reboot
Load modules
sudo modprobe fbtft_device name=flexpfb rotate=270
sudo modprobe flexfb chip=ili9488
You will have a new frame buffer /dev/fbX
Find a flexfb framebuffer node
ls /dev/fb*
/dev/fb2
cat /sys/class/graphics/fb2/name
flexfb
Run Console

0. Install package
sudo apt-get install fbset
1. backlight enable
ODROID-XU4 does not use PWM control
echo 500000 | sudo tee /sys/devices/platform/pwm-ctrl/freq0
echo 1 | sudo tee /sys/devices/platform/pwm-ctrl/enable0
echo 1023 | sudo tee /sys/devices/platform/pwm-ctrl/duty0
2. Run con2fbmap
con2fbmap <console> <framebuffer>
sudo con2fbmap 1 2
3. Change foreground virtual terminal
The command chvt N makes /dev/ttyN the foreground terminal.
sudo chvt 1
chvt 1 : console
chvt 7 : X11
4. Auto login on console
Edit tty1 service
sudo systemctl edit getty@tty1
And add
[Service]
ExecStart=
ExecStart=-/sbin/agetty -a odroid --noclear %I $TERM
odroid@odroid:~$ sudo systemctl cat getty@tty1 | grep Exec
ExecStart=-/sbin/agetty --noclear %I $TERM
ExecStart=
ExecStart=-/sbin/agetty -a odroid --noclear %I $TERM
Restart tty1 service
sudo systemctl restart getty@tty1
Run Xwindow

0. Create a new config file
sudo cp /etc/X11/xorg.conf /etc/X11/xorg.conf.old
sudo rm -fr /etc/X11/xorg.conf.d/exynos.conf
Add following lines in “/etc/X11/xorg.conf” file.
Section "Device"
    Identifier    "C fbdev"
    Driver        "fbdev"
    Option        "fbdev" "/dev/fb2"
EndSection
1. Backlight enable
ODROID-XU4 does not use PWM control
echo 500000 | sudo tee /sys/devices/platform/pwm-ctrl/freq0
echo 1 | sudo tee /sys/devices/platform/pwm-ctrl/enable0
echo 1023 | sudo tee /sys/devices/platform/pwm-ctrl/duty0
2. Run
sudo /etc/init.d/lightdm start
Backlight control
ODROID-XU4 does not use PWM control
Set frequency & enable
echo 500000 | sudo tee /sys/devices/platform/pwm-ctrl/freq0
echo 1 | sudo tee /sys/devices/platform/pwm-ctrl/enable0
echo <0-1023> | sudo tee /sys/devices/platform/pwm-ctrl/duty0 =⇒ for back light brightness control
echo 1023 | sudo tee /sys/devices/platform/pwm-ctrl/duty0
Touch Calibration
0. The xinput-calibrator pakage download
sudo apt-get install xinput-calibrator
1. Login
You need a login to get DISPLAY.
If you want auto login.
Edit /etc/lightdm/lightdm.conf file to enable auto-login: (password: odroid)
odroid@odroid:~$ sudo vi /etc/lightdm/lightdm.conf
[sudo] password for odroid:
odroid@odroid:~$ cat /etc/lightdm/lightdm.conf
[SeatDefaults]
autologin-user=odroid
autologin-user-timeout=0
odroid@odroid:~$
2. Check your DISPLAY
odroid@odroid:~$ w
09:13:31 up 35 min,  2 users,  load average: 0.09, 0.08, 0.12
USER     TTY      FROM             LOGIN@   IDLE   JCPU   PCPU WHAT
odroid   ttySAC2                   08:42    2.00s  0.75s  0.02s w
odroid   :0       :0               05:39   ?xdm?   1:15   0.63s mate-session
odroid@odroid:~$
3. Run calibrator
If your display mode is portrait(rotate 0 or 180), run following command.
DISPLAY=:0 xinput set-prop 'SX865X Touchscreen' 'Evdev Axes Swap' 0
Run
DISPLAY=:0 xinput_calibrator
Follow the directions on your screen.
then, you will get something like

Copy to “/etc/X11/xorg.conf.d/99-calibration.conf”
sudo mkdir /etc/X11/xorg.conf.d/
sudo vi /etc/X11/xorg.conf.d/99-calibration.conf
4. Reboot
sudo reboot
Using keypad
There are four tact switches on LCD shield. And the switches change a value of adc when you preess the these.
sysfs node
C2 - /sys/class/saradc/ch0
C1 - /sys/class/saradc/saradc_ch0
XU4 - /sys/devices/12d10000.adc/iio\:device0/in_voltage3_raw
| SBC | switch num | ADC value |
|---|---|---|
| C2/C1 | SW1 | 5 ±10 |
| SW2 | 515 ±10 | |
| SW3 | 680 ±10 | |
| SW4 | 770 ±10 | |
| XU4 | SW1 | 0 ±100 |
| SW2 | 2030 ±100 | |
| SW3 | 2695 ±100 | |
| SW4 | 3014 ±100 |
Build Wiring Pi
sudo apt-get install git
git clone https://github.com/hardkernel/wiringPi
cd wiringPi
./build
Build a source code
4 Keys on the shield will be mapped to “SPACE”, “UP”, “DOWN”, “ENTER” input event.
ODROID-C2/C1
wget http://dn.odroid.com/source_peripherals/lcd35/tftlcd35_key.c
Compile & Run
gcc -o tftlcd35_key tftlcd35_key.c -lwiringPi -lwiringPiDev -lpthread
sudo ./tftlcd35_key &
ODROID-XU4
wget http://dn.odroid.com/source_peripherals/lcd35/tftlcd35_key_xu4.c
Compile & Run
gcc -o tftlcd35_key_xu4 tftlcd35_key_xu4.c -lwiringPi -lwiringPiDev -lpthread
sudo ./tftlcd35_key_xu4 &
