Table of Contents
I2C
This page introduces how you can I2C interface using Expansion Board.
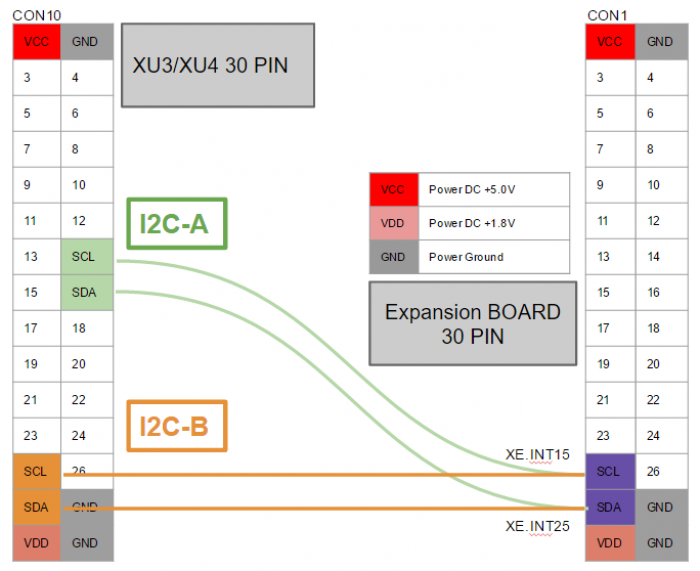
The Expansion Board have two I2C devices.
You can use the devices via H/W I2C(I2C-A) or S/W I2C(I2C-B : GPIO-I2C).
H/W I2C (I2C-A)
| Kernel 3.10.y (node name) | Kernel 4.9.y (node name) | Pin Number (XU3/XU4 - CON10) | Net Name | Export Number | Description |
|---|---|---|---|---|---|
| /dev/i2c-4 | /dev/i2c-1 | 16 | GPB3[2](I2C_1.SDA) | 209 | SDA |
| 14 | GPB3[3](I2C_1.SCL) | 210 | SCL |
S/W I2C (I2C-B)
| Kernel 3.10.y (node name) | Kernel 4.9.y (node name) | Pin Number (XU3/XU4-CON10) | Net Name | Export Number | Description |
|---|---|---|---|---|---|
| /dev/i2c-10 | 27 | GPX3[1](XEINT_25) | 33 | SDA | |
| 25 | GPX1[7](XEINT_15) | 23 | SCL | ||
How to check Expansion board with i2c-tools.
Install i2c-tools package.
odroid@odroid:~$ sudo apt-get install i2c-tools
I2C Device check command
- Usage : i2cdetect -y -r [i2c node name]
Using the HW I2C(I2C-A) with Expansion Board
I2C Device check
odroid@odroid:~$ sudo i2cdetect -y 4

    0  1  2  3  4  5  6  7  8  9  a  b  c  d  e  f
00:          -- -- -- -- -- -- -- -- -- -- -- -- --
10: -- -- -- -- -- -- -- -- -- -- -- -- -- -- -- --
20: -- -- -- -- -- -- -- -- -- 29 -- -- -- -- -- --
30: -- -- -- -- -- -- -- -- -- -- -- -- -- -- -- --
40: -- -- -- -- -- -- -- -- -- -- -- -- -- -- -- --
50: -- -- -- -- -- -- -- -- -- -- -- -- -- -- -- --
60: -- -- -- -- -- -- -- -- -- -- -- -- -- -- -- --
70: -- -- -- -- -- -- -- 77

odroid@odroid:~$
- The 0x29 is BH1780 slave address.
- The 0x77 is BMP180 slave address.
Get BMP180 ID using i2cget.
odroid@odroid:~$ sudo i2cget 4 0x77 0xD0
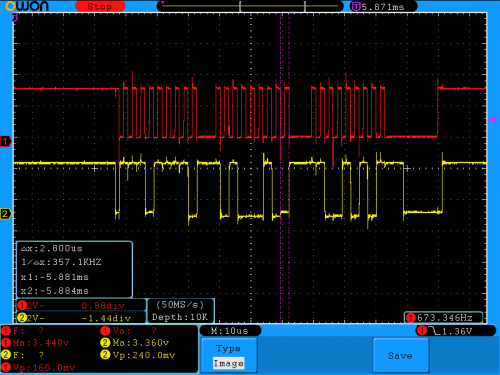
H/W I2C Signals
Using the S/W I2C(I2C-B) with Expansion Board
Upload the module
GPIO-I2C driver probe [ i2c-gpio-custom driver option : id,sda,scl[,udelay,timeout,sda_open,scl_open,scl_outonly]
odroid@odroid:~$ sudo modprobe i2c-gpio-custom bus0=10,33,23,10,10
I2C Device check
odroid@odroid:~$ sudo i2cdetect -y -r 10

    0  1  2  3  4  5  6  7  8  9  a  b  c  d  e  f
00:          -- -- -- -- -- -- -- -- -- -- -- -- --
10: -- -- -- -- -- -- -- -- -- -- -- -- -- -- -- --
20: -- -- -- -- -- -- -- -- -- 29 -- -- -- -- -- --
30: -- -- -- -- -- -- -- -- -- -- -- -- -- -- -- --
40: -- -- -- -- -- -- -- -- -- -- -- -- -- -- -- --
50: -- -- -- -- -- -- -- -- -- -- -- -- -- -- -- --
60: -- -- -- -- -- -- -- -- -- -- -- -- -- -- -- --
70: -- -- -- -- -- -- -- 77

odroid@odroid:~$
- The 0x29 is BH1780 slave address.
- The 0x77 is BMP180 slave address.
Get BMP180 ID using i2cget.
odroid@odroid:~$ sudo i2cget 10 0x77 0xD0
How to change the I2C clock speed
To change the I2C clock speed, you need to modify the DT(Device Tree) file.
Install required packages.
sudo apt-get install device-tree-compiler i2c-tools
Make a backup of DTB file.
- kernel 4.9.y
cp /media/boot/exynos5422-odroidxu4.dtb /media/boot/exynos5422-odroidxu4.dtb.org
- kernel 3.10.y
cp /media/boot/exynos5422-odroidxu3.dtb /media/boot/exynos5422-odroidxu3.dtb.org
Using dtc command, you can make “dts” type of device tree from “dtb” type.
- kernel 4.9.y
dtc -I dtb -O dts -o exynos5422-odroidxu4.dts exynos5422-odroidxu4.dtb
- kernel 3.10.y
dtc -I dtb -O dts -o exynos5422-odroidxu3.dts exynos5422-odroidxu3.dtb
And, open by an editor you like it and check the i2c path.
vi exynos5422-odroidxu4.dts

--------------------------------------
..
/ {
..
    soc {
..
    i2c@12C70000 {
..
--------------------------------------
Check current maximum bus frequency of i2c@12C70000
- kernel 4.9.y
fdtget /media/boot/exynos5422-odroidxu4.dtb /soc/i2c@12C70000 samsung,i2c-max-bus-freq
- kernel 3.10.y
fdtget /media/boot/exynos5422-odroidxu3.dtb /i2c@12C70000 samsung,i2c-max-bus-freq
Change the DTB file for i2c-1 (i2c channel #1)
- kernel 4.9.y
fdtput -t i /media/boot/exynos5422-odroidxu4.dtb /soc/i2c@12C70000 samsung,i2c-max-bus-freq "10000"
sync
reboot
- kernel 3.10.y
fdtput -t i /media/boot/exynos5422-odroidxu3.dtb /i2c@12C70000 samsung,i2c-max-bus-freq "10000"
sync
reboot
If you want to go back to original 400Khz mode, change “10000” to “400000”.
Actual I2C clock speed (Measured with an oscilloscope)
In 400Khz mode : 344.8khz
In 100Khz mode : 63.7khz
In 10Khz mode : 9.3Khz
Default I2C clock speed
XU4 : 400Khz mode

